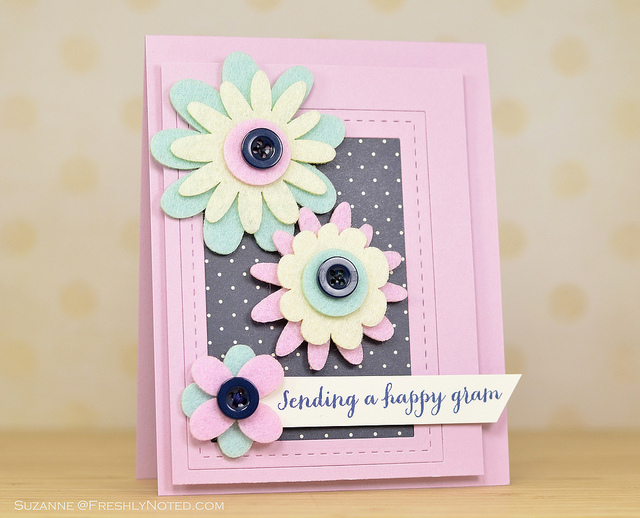
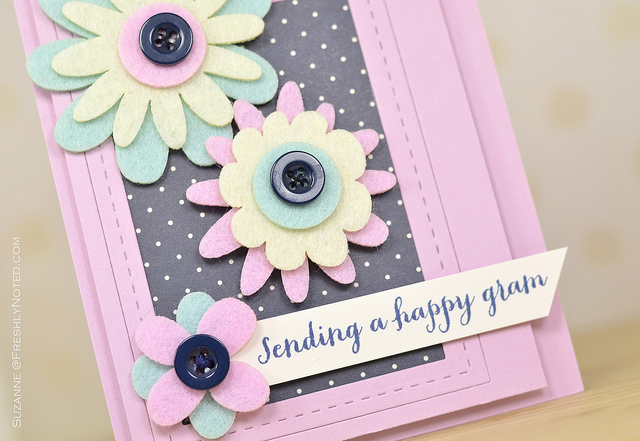
Work was so slow today that I couldn’t help but sit there wishing that I was crafting. Browsing blogs, I came across this week’s CASE Study Challenge with Jocelyn Olson as the muse. Jocelyn is known for her use of digital elements in her designs, and with a computer loaded with Photoshop at my disposal, I thought I would give digital design a try for the first time. I’ve long avoided it because I typically love how this hobby gets me away from the computer, but my office isn’t stocked with ink or paper!
Using Jocelyn’s card as a guide, I researched how to use what is called a “digital brush” online and downloaded one from Adrienne Looman, whom I found on Jocelyn’s blog. This is basically an electronic file that contained these flower images. From there, I started adding them to my file in a variety of colors until the last thing to do was print out the image. I came home and trimmed it down to make the card. The Hero Arts sentiment was heat embossed in white onto the green cardstock, and I was excited to find the huge blue button to match in my stash.
Enjoy your weekend!
Suzanne
Hope you had a happy 4th of July! After a trip to the beach, a BBQ and going to see a movie, I hunkered down to make this card for Mojo Monday 300, using some Crate Paper On Trend goodies.
Have a fabulous Friday!
Suzanne
No, you are not seeing things. Yes, that is a 1-layer card! It may be a first for me, and lemme tell you how difficult this was for me: VERY!!
I made this card using lots of Hero Arts goodies for their One Layer Card Challenge and for A Blog Named Hero’s Fave Stamp Challenge. I started with a piece of Bazzill taffy cardstock which was diecut using the Hero Arts tag die. Then I started stamping with lots of masking using my favorite stamp right now: the Scalloped Flower. I’ve linked up all the supplies for you below.
Thanks so much for looking!
Suzanne
……………
Stamps (all from Hero Arts): Tropical Leaf, Thank You, Envelope Pattern, Scalloped Flower, Big Tag; Ink: Hero Arts (pale tomato, raspberry jam, cup o’ joe, tide pool), A Muse Studio (latte); Other: HA large tag die, rhinestones, Bazzill cardstock (taffy), A Muse Studio cardstock (white).
Welcome to Monday, everyone! Here’s a first for me: I made this card very early this morning, before going to work! Here’s to hoping that this great start to my day sets the tone for the whole holiday week! Did you have a fun weekend? I spent the day shopping with my mom and sister on Saturday, and yesterday my hubby and I ran errands and just hung out.
I used some A Muse Studio Squeeze the Day stamps and dies on this card today, along with the Lil’ Inker stitched rectangles and a plaid impression plate from PTI. These summery Lawn fawn papers seemed to fit the lemony theme pretty well.
Thanks to everyone who left a comment letting me know that you had found me here at my new home on the internet. I really appreciate it!!! The winner of the $25 gift certificate to the store of her choice is Joyce M.! YAY, Joyce!!! I am so happy for you! I will send you an e-mail!
Suzanne
I have been meaning to show you what other crafty things that I’ve been dabbling in for some time. A few months ago, I decided to try making some flower cabochon bracelets, and here’s my latest. I’ve had a *slight* obsession with them for some time, after buying a couple on Etsy.
I used clay and molds to make most of the flowers. The aqua ones were in my crafty stash, and I am not sure if I made those with resin ages ago or if I purchased them at my LSS. With some help from my local bead shop, I was able to put this all together with gold findings and jump rings.
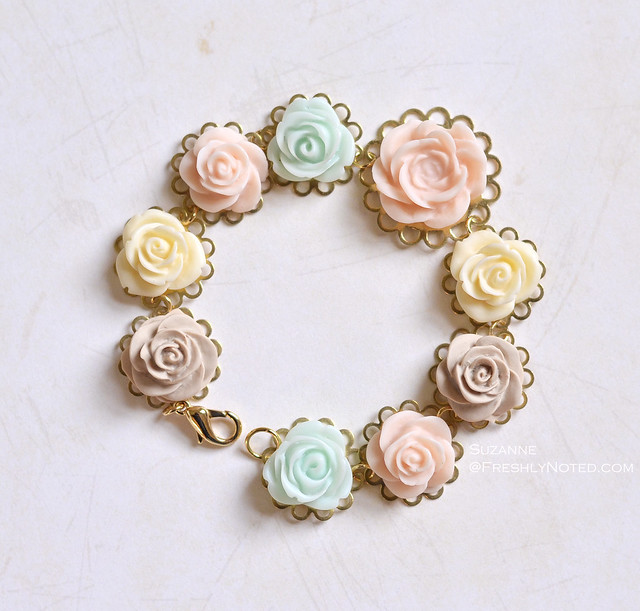 This is the first one that I’ve made in pastels…now I just need to find an outfit to match!
Suzanne
Happy Friday! Last night I signed up for Summer Card Camp 2, and made this card for Pre-Class Challenge 2. I love the font on this Hero Arts sentiment, which was also stamped in Hero Arts navy ink, my most favorite of favorite navy inks! The patterned paper and flowers are from Fancy Pants, and I used the stitched rectangles from Lil’ Inker Designs to create the rectangle frame.
Are you signing up for Camp too? I am also entering this into the Simon Says Stamp Challenge for this week, since “anything goes”! Have an awesome weekend!
Suzanne
Hey there! Just a quick note to let you know that I am sharing a card that I made over on the Neat and Tangled blog today. Here’s a little peek for you…hope to see you there!
Suzanne
Hi there! Today is the Papertrey Ink June Blog Hop and the theme this month is Touch of Gold. I made two clean and simple cards for it using a sentiment from Mini Blooms and flowers from Bigger Blooms. For my touch of gold, I used a sheet of gold glitter paper from American Crafts - this stuff is so awesome.
On my first card, I had an idea for this funky wrapped look, using a nontraditional color scheme. I trimmed and layered pieces of cardstock until I got the look that I wanted and I think it made for a fun card. It’s in the mail for Kristie!
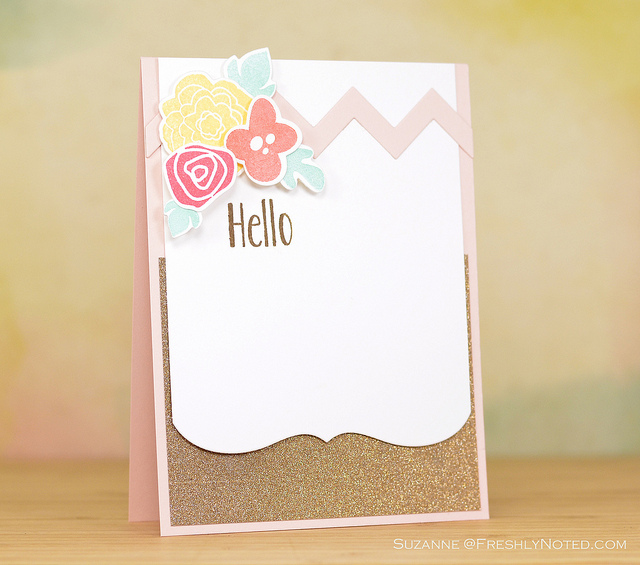
Using similar colors, I then stamped the Bigger Blooms onto some diecuts and adhered them to a chevron piece from the Chevron Cover Plate to create a more girly card. I used Mega Mat Stack 4 to create the decorative edge along the bottom of the white panel, which reminds me of a mega version of one of the Half & Half dies.
Thanks so much for stopping by!
Suzanne
Just sharing a card that I made a few weeks ago and had to wait to post until the Lil’ Inker stitched circles were released. I combined those dies with some Fancy Pants papers and this stamp set from Simon Says to make this simple card - I think the yellow is so fun!
I’m heading back to work today after 3 weeks off. Wish me luck, pretty please!
Suzanne
It has been a little more than a week since I changed over my blog from Blogger to WordPress, and several people commented or wrote asking me about the DIY process. I thought I would share some thoughts, but please keep in mind that I am far from a computer expert; I learned how to do this using internet searches and reading articles online. I’ve tried to break the process up into several categories for you to make this easier to understand, but I will warn you that this is a long post:
Renaming my Blog
The first part of this process took place for me last winter when I decided that I wanted to rename my blog; at that time I wasn’t quite sure I would switch blogging platforms. I thought of many names for quite some time, and in January I decided that I liked this name the best and bought the domain. Then I sat on it to test out the name in my head. After several months had passed, I realized that I still liked the blog name and some friends didn’t have any adverse reactions to it when I talked to them about it, so that part was done.
Why did I choose this name? I knew that I did not want to use my name as my domain name for a few reasons. One is for professional reasons - since I have a website for work, I wanted to minimize the chance that anyone from work would find me (realizing that horse may have left the barn, but still…). I also wanted the domain name to match the blog name, and I wanted the blog name to be applicable to things outside of cardmaking should I ever decide to start blogging about something else. Lastly, I knew the name had to be something I would not get tired of, since my guess is that there are only so many times you can switch blog names. (As I explained previously, my old blog name just wasn’t “me” anymore for a variety of reasons, even though it was certainly fun for me to say it in my Boston accent.)
Switching Blogging Platforms
The decision for me to switch away from Blogger was pretty easy: despite the fact that I had been using only 2.29MB of space in Google (where up to 15MB of space is supposed to be free for email, blogging and photos), Blogger forbade me from posting at some point because I was “out of space.” This happened to me in the middle of a DT post, so I panicked and forked over my credit card info to pay $2.49 per month for up to 25MB of storage; when I looked into this, I realized that there is not a very user-friendly customer service forum/email/avenue for addressing this with Blogger. I had been housing my photos in Flickr for years, and to this day it utterly baffles me that I had to pay for storage. (I am still getting warning messages from Google in my Gmail, so we shall see what happens with that next.) I wasn’t angry about the money, I was angry that there seemed to be no real reason why I was being charged this fee, and there seems to be no outlet for reconciling it. The disappearance of Google Reader made me weary of Blogger’s future, and the repeated push for me to join Google Connect and Google+ really irritated me.
(As a side note, I can’t say enough good things about using Flickr for storing my photos. Blogger does something wonky to your photos to resize them for their format, making them a little blurry. Go ahead and try loading blog pics from Flickr to see if you notice a difference; I read about this online a long time ago, and I didn’t believe it until I tried it myself. When you upload your photos to Blogger, your photos are stored in a Google Picasa Web album…I am not sure how many people realize this, since I don’t think Google does the best job of laying this all out for people. In my opinion, switching to Flickr means that you gain more control over your photos regardless of your blogging platform.)
The next step was deciding whether or not to move to WordPress or Typepad. I chose WordPress since it seemed more popular and because there seem to be more options for blog designs with WordPress. One thing that I realize now is that WordPress.com blogs are free, but they lack the level of customization one might prefer if considering a blog redo; WordPress.org is a different option that allows more flexibility with blog design. The important thing to note is that most WordPress templates that are available online from designers cater to WordPress.org blogs, which are not free. As best as I can tell, these blogs require a domain name and hosting service. Another benefit of WordPress is the online community that supports it, including a blog that appears to be authored by the original WordPress inventors - I’ve been so happy with how easy it is to find out how to do something in Blogger by searching the web.
Blog Hosting for WordPress.org
Here is where is starts to get tricky. I am pretty sure that having a blog in WordPress.org requires that you have a web hosting provider and your own domain. I read several articles on recommended blog hosts, and fairly consistently Bluehost.com was recommended for WordPress.org blogs, though I am sure others are great too. The tricky part for me was that I had purchased my domain from GoDaddy.com months previously, and Bluehost offers the domain for free when you sign up for hosting with them. I had to go through the added step of transferring my domain from GoDaddy to Bluehost after purchasing the hosting service, which was on sale for roughly $4 per month, but there can be all kinds of fees on top of this for things like virus/spam protection, etc. The tutorial that I used to get me through this part of the process can be found here. Please feel free to review all the options that they give to choose what might be best for you. In this article, it talks about uploading WordPress to your hosting service, but it was all pretty self-explanatory to setup once I opened my account with Bluehost. There was even a point at which it asked me to call their customer service line for setup, but they beat me to the punch - they called me before I could even reach for my phone, and the gentleman on the other end of the line was so helpful! This just made me happy. (As an aside, I believe that Typepad also charges a fee for blogging there, but I am not familiar with the details.)
Wordpress Templates
At some point, after following all of the Bluehost setup instructions, you will be ready to customize and beautify your blog. I tried for years to do this myself in Blogger, and gave up some point about a year ago when I realized that there are some pretty affordable templates online that make a blog pretty with a few clicks of a button. Without knowing the ins and outs of how WordPress operated at the time, it was not tough for me to give in to the idea of buying a WordPress template. I searched online and on Etsy for quite a bit of time for something affordable that also allowed for customization and added features like social media icons. If you also choose this route, you may find that some templates come with any particular software that might be needed to run their templates, whereas others expect that you purchase it separately. You may also need to consider whether or not you own programs that will allow you to edit and customize files like a blog header (using Adobe Illustrator, for example). Again, be sure to pay attention to whether or not the template is designed for WordPress.org or WordPress.com. You might also want to explore how much it would cost for the blog design company to make all the changes for you, since this is a very time consuming and not so straightforward process at times; I have spent easily more than 30 hours working on this over the course of the last week because even after the template was loaded, there were (and remain to be) lots of things that I would like to further tweak or customize.
In the end, I don’t think I could have done all of this if I weren’t on vacation - my eyeballs hurt! The DIY approach is not for everyone, but there’s certainly a very nerdy part of me that loves tinkering with the computer code and back-end stuff. From what I could tell, you can spend anywhere from $25 to $1600 on custom WordPress templates (I am not gonna lie, the $1600 one was freakin’ awesome, but it was meant for someone with a hardcore real business, not a cardmaker, LOL!), but there are also TONS of great options built into WordPress itself.
That being said, WPBeginner is a great site for learning how to do things in WordPress. There are downloadable widgets for pretty much everything, and the majority of them seem to be free. Internet searches will easily help you find what you might be looking for, but my approach is always to cross-reference several articles to compare opinions of plugins and approaches to CSS code. You can visit the WPBeginner site and sign up for daily email tutorials, and I’ve enjoyed browsing those. The WordPress Codex is also an AWESOME help tool.
I feel like that’s just scratching the surface since there are a lot of details that I may have missed. The hardest part is having to learn a whole new way of blogging under what is a more complicated system to set up (writing posts is easy!); this takes time and patience, especially researching all the options.
One last piece of info relates to followers and redirecting my old blog to this one. Some of you have let me know that my new blog is showing up in your Reader still (thank you!), and that is good news. I was using Feedburner with my old blog and was able to switch the code in Blogger to burn the new feed affiliated with this blog, so it seems that I have been able to keep most followers. I found this tutorial online, but admit that there were a few bits that I am not sure are working entirely. Of course, you can always buy your own domain and stick with Blogger if you just want your own .com, and probably find very similar tutorials online for that.
In the end, I am loving the change despite all the work and tinkering. If I haven’t bored you to death and you have any other questions, please feel free to e-mail me anytime or just comment here. Again, I am not an expert, but am happy to help if I can!
Suzanne
